by Greg Carter | Jul 24, 2018 | Aerobatics, Did You Know . . ., Hints and Kinks, Model Building, Reviews, Scale, UAV
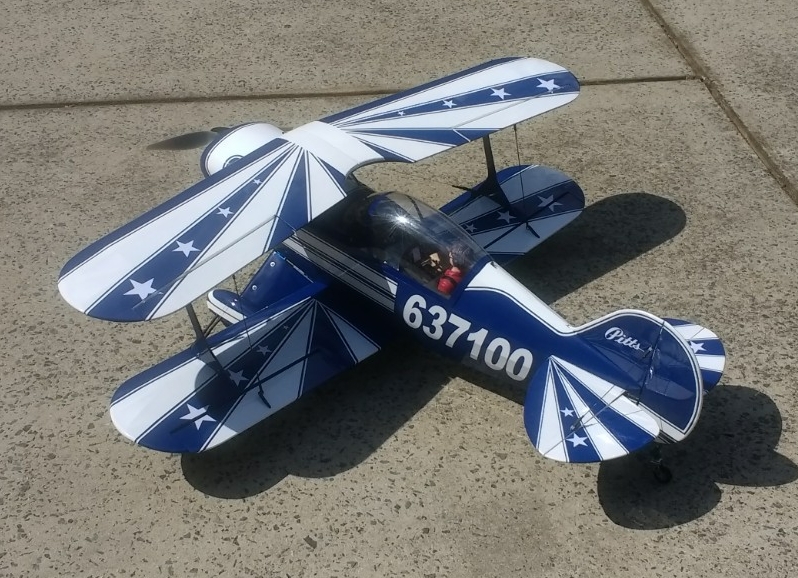
The Pitts S-2B from Kingcraft is an ARF model airframe in an all wood construction using balsa and plywood. It comes with a painted lightweight fiberglass cowling. If you come from a builder background, you will appreciate the design details and the ultra scale dual cockpit with instrument panels which resemble that of the full-scale Pitts S-2B. The manufacturing level and quality of this Pitts ARF is impressive, most of the woodwork is done by hand and not by machine. When I received my kit from HobbyKing, it came in a designer box with all parts well packaged. You should not judge the content by its cover, but it looked good to me and I was ready to get started when I saw the box and content. Each part was packaged very well and no part was found to be damaged. Even the box it came in was structurally strong. The Instruction Manual is well thought out and can help you put the plane together in a few evenings. There were a few things I chose to do a little different and I am sharing with you as follows. I started the build with the wings. I was able to find the placement of the fiberglass horns and inter-plane struts by looking at their placement in the pictures and rubbing my finger over the area until finding the slots. I then took a knife an uncovered the slots. The servos were installed and wings were assembled. I proceeded to work on the fuselage and where the wings will attach. They supplied wood cross struts, however, I chose to use for...
by Dick Pettit | Aug 19, 2016 | Hints and Kinks, Model Building
Many modelers ask me how I got interested in building and flying large airplanes. They ask for advice and information on how to go from .40 to .60 size planes using glow engines to giant models using larger gas powered models. I won’t put this into a step-by-step dissertation, but rather discuss some of the things modelers should consider when contemplating such a move. Some of this information is nothing more than good old common sense, supported by my own personal experiences and a few tips and tricks thrown in for good measure. There are usually a number of ways of accomplishing any desired goal, so none of my advice should be considered the one and only way. I’m merely presenting and sharing what works well for me. First we have to decide what type of large model we want. This decision is based on several factors. How much time and money are we willing to invest? Is our work area, storage area and transportation vehicle large enough? Do we have sufficient building and flying experience? A modeler who has successfully built and flown a high wing trainer, a low wing sport plane and maybe a fun-fly plane, will probably have the necessary experience to build and fly an high or low wing sport or semi-scale giant project. You might have notices that I didn’t recommend a high-performance aerobatic model such as a CAP, or Ultimate biplane, or a heavy metal warbird like a P-51 Mustang. I believe a modeler’s first giant should be similar to his first trainer or sport plane, just bigger and heavier. Before we can...
by Dick Pettit | Jul 28, 2016 | Hints and Kinks, Model Building, Reviews
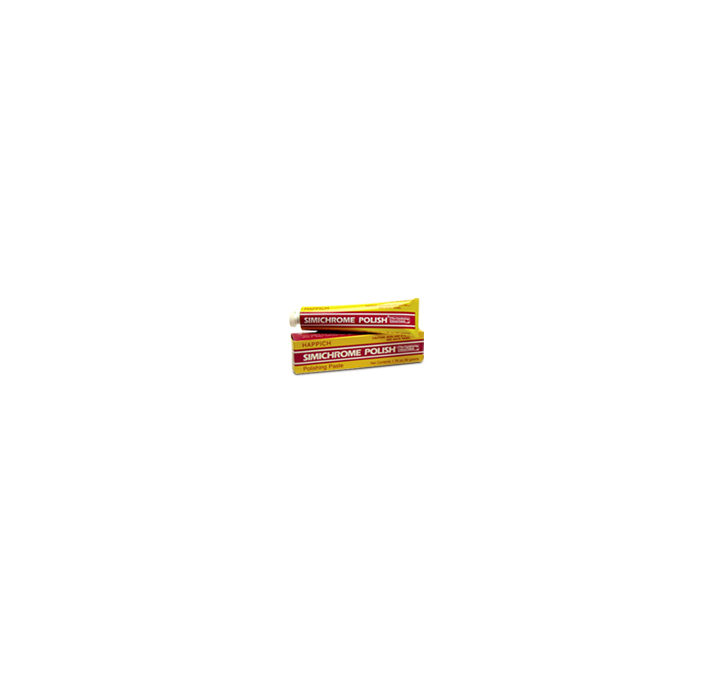
There’s a product that I have been using to shine all sorts of metal products around the workshop and the household too. It’s called Simichrome and it will make just about any metal shine like a star. I found out about it from a friend that has been using it on his metal parts on his motorcycles for many years and once I bought a tube of it, I was hooked. These days, it is available from Amazon.com and a tube of it costs about $10.00, and it will last a long time. I have used it many times on aluminum spinners and mufflers, and if you follow the simple instructions, your spinners and mufflers will look as if was chrome plated. However, that’s not what I came to talk to you about today. I came here to talk about another use for Simichrome that just about all of you could have used over the years. I recently had to remove a few scuffs and scratches and CA fingerprints from a clear plastic side window on one of my planes. Rather than remove it, cut a new one and run the risk of getting more CA fingerprints on the new one, I tried to remove these nasty marks with just about every product I had available. I first thought of using CA remover, which would certainly take off the CA prints, but would probably melt the plastic. I tried WD-40, alcohol, paint thinner and even very fine emery paper, none of which worked at all. Then I spotted that tube of Simichrome sitting on the shelf and decided to...
by Dick Pettit | Jun 22, 2016 | Hints and Kinks
Now, now, let’s not go there. I’m not talking about working out to reduce flab. I want to talk a little about adding tail brace wires to your larger models. These suggestions may also be used on many smaller models. The main purpose of tail brace wires is to provide extra strength between the fuselage, stabilizer and the fin. Many models I have built have very little contact area between these parts, which often results in too little strength to hold these pieces together. Full size planes sometimes use lower braces only, or a combination of upper and lower braces to provide the required strength. Let’s take a look at several ways of building tail braces for your model. Probably the easiest and lightest method of building tail braces is to use braided fishing leader connected to small metal brackets attached to the surfaces. This wire is available wherever fishing supplies are sold, and while you’re shopping, get a package of ferrules, the correct name of those little crimp-on sleeves used to join the wires permanently. Holes drilled through balsa surfaces need to be reinforced to take the loads, and this should be done before covering, by drilling holes for sections of hardwood dowels or plywood glued in place and sanded smooth. Drill a hole for a 2-56 or 4-40 bolt to pass through, and you’re ready to add the braces. If your model is already covered in these areas, simply drill a hole for a piece of hard brass tubing through which you will later pass the bolt. This way, tightening the bolt and nut won’t crush or...